visualization prototyping and scripting
Tutorials
- How to draw basic shapes with SUMMON (01_basics.py)
- How to use transforms: translate, rotate, scale, flip (02_basics.py)
- Hotspots and interactive visualizations (05_hotspots.py)
- more to come...
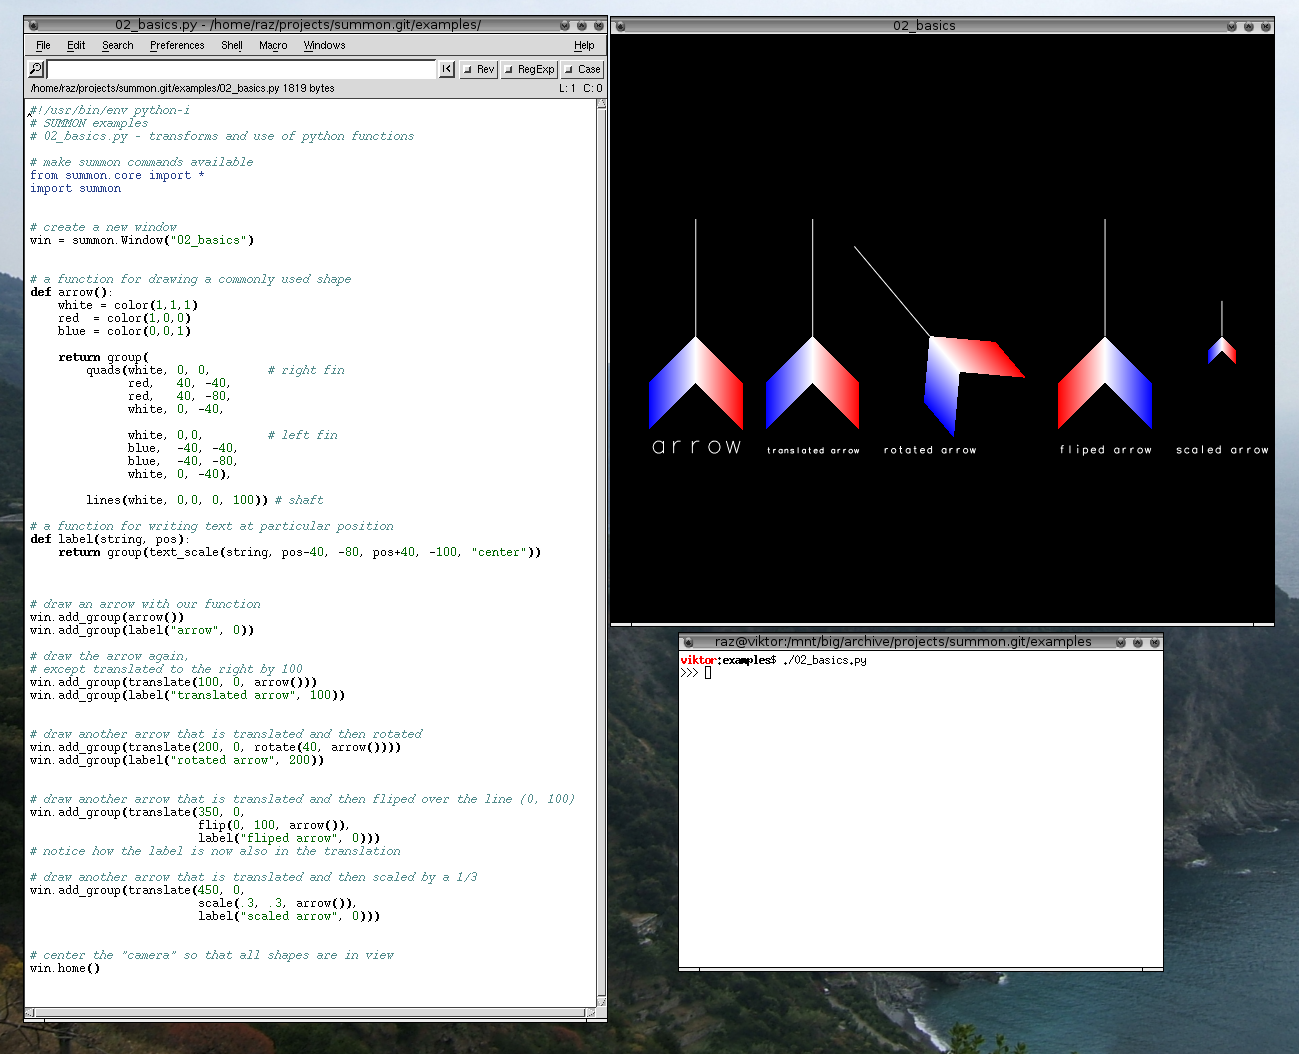
How to use transforms: translate, rotate, scale, flip (02_basics.py)
Open and run the example
For an introduction to the basic API of the SUMMON module, let us walk through the code of the second example. This example is included in the source code (download) under the summon/examples directory. To begin, change into the summon/examples/ directory and open up 02_basics.py in a text editor. Also execute the example with following command.
The following visualization should immediately appear in a new OpenGL window.
Overview of the example source code
In your text editor, the example 02_basics.py should contain python code similar to the code displayed below.
#!/usr/bin/env python-i
# SUMMON examples
# 02_basics.py - transforms and use of python functions

# make summon commands available
from summon.core import *
import summon


# create a new window
win = summon.Window("02_basics")


# a function for drawing a commonly used shape
def arrow():
    white = color(1,1,1)
    red  = color(1,0,0)
    blue = color(0,0,1)

    return group(
        quads(white, 0, 0,        # right fin
              red,   40, -40,
              red,   40, -80,
              white, 0, -40,

              white, 0,0,         # left fin
              blue,  -40, -40,
              blue,  -40, -80,
              white, 0, -40),

        lines(white, 0,0, 0, 100)) # shaft

# a function for writing text at particular position
def label(string, pos):
    return group(text_scale(string, pos-40, -80, pos+40, -100, "center"))


# draw an arrow with our function
win.add_group(arrow())
win.add_group(label("arrow", 0))

# draw the arrow again,
# except translated to the right by 100
win.add_group(translate(100, 0, arrow()))
win.add_group(label("translated arrow", 100))


# draw another arrow that is translated and then rotated
win.add_group(translate(200, 0, rotate(40, arrow())))
win.add_group(label("rotated arrow", 200))


# draw another arrow that is translated and then fliped over the line (0, 100)
win.add_group(translate(350, 0,
                        flip(0, 100, arrow()),
                        label("fliped arrow", 0)))
# notice how the label is now also in the translation

# draw another arrow that is translated and then scaled by a 1/3
win.add_group(translate(450, 0,
                        scale(.3, .3, arrow()),
                        label("scaled arrow", 0)))


# center the "camera" so that all shapes are in view
win.home()
Using a Python function to define a commonly drawn shape
In this example, we will draw an arrow in several different ways. To automate the drawing of the arrow, we can define a Python function that returns a group describing an arrow.
# a function for drawing a commonly used shape
def arrow():
    white = color(1,1,1)
    red  = color(1,0,0)
    blue = color(0,0,1)

    return group(
        quads(white, 0, 0,        # right fin
              red,   40, -40,
              red,   40, -80,
              white, 0, -40,

              white, 0,0,         # left fin
              blue,  -40, -40,
              blue,  -40, -80,
              white, 0, -40),

        lines(white, 0,0, 0, 100)) # shaft
The arrow is constructed using the same drawing functions (group, lines, and color) that were introduced in 01_basics.py. We can also automate the drawing of text labels with another function that we will call label. This function takes the text of the label and a single position argument.
# a function for writing text at particular position
def label(string, pos):
    return group(text_scale(string, pos-40, -80, pos+40, -100, "center"))
Create and arrow and label using our functions
Now that our functions are defined, we can call them and pass their return values to the window's add_group function.
# draw an arrow with our function
win.add_group(arrow())
win.add_group(label("arrow", 0))
Your first transform: translate
With the arrow function defined, we can easily draw another arrow. However, we would like to draw an arrow in a new location (i.e. not on top of the one previously drawn). That can be achieved with the translate function.
# draw the arrow again,
# except translated to the right by 100
win.add_group(translate(100, 0, arrow()))
win.add_group(label("translated arrow", 100))
With the execution of these two lines, a second arrow should appear with the text label "translated arrow" underneath it. The translate function creates a drawing group whose contents are translated along the x- and y-axis according to the first two arguments (e.g. 100, 0). In this example, the second arrow appears 100 units to the right and 0 units above the previous arrow.
Nesting transforms: translate, rotate, flip, and scale
Transforms can be nested to produce a greater variety of effects. The following two lines translates another arrow even further to the right (200 units) and then rotates it with the rotate function 40 degrees counter-clockwise.
# draw another arrow that is translated and then rotated
win.add_group(translate(200, 0, rotate(40, arrow())))
win.add_group(label("rotated arrow", 200))
Below, the fourth arrow is also drawn using nested transforms, and demonstrates the use of the flip transform.
# draw another arrow that is translated and then fliped over the line (0, 100)
win.add_group(translate(350, 0,
                        flip(0, 100, arrow()),
                        label("fliped arrow", 0)))
# notice how the label is now also in the translation
This produces an arrow with a left red fin and right blue fin. The flip transform defines a line between the origin (0,0) and another point that you specify (e.g. (0, 100)) and flips (reflects) the contents over it. In this example, the arrow is flipped over the vertical line. Notice, that the text label is also contained within the translate transform and is translated with the arrow.
Lastly, the scale transform is demonstrated on the fifth and last arrow. The scale function takes two arguments (e.g. .3, .3) before its contents, which specify x- and y-axis scaling factors for the contents. The following code creates an arrow that is 0.3 the size of the original.
# draw another arrow that is translated and then scaled by a 1/3
win.add_group(translate(450, 0,
                        scale(.3, .3, arrow()),
                        label("scaled arrow", 0)))
Bring it all into view
The final function in the script is win.home(), which causes the SUMMON window to scroll and zoom such that all graphics are visible. This is a very useful command for making sure that what you have drawn is visible in the window. The command can also be executed by pressing the 'h' key within a SUMMON window. This key comes in handy when you "lose sight" of the visualization.
And much more...
This is only a simple example. There are more advance transforms, such as the zoom_clamp.
See the remaining scripts in the summon/examples/ for examples of SUMMON's more powerful features. For more documentation, also see the manual and online API documentation.
Next time: Hotspots!
In the next tutorial, we will explore the hotspot function and how we can use it to define interactive visualizations.