visualization prototyping and scripting
Tutorials
- How to draw basic shapes with SUMMON (01_basics.py)
- How to use transforms: translate, rotate, scale, flip (02_basics.py)
- Hotspots and interactive visualizations (05_hotspots.py)
- more to come...
Hotspots and interactive visualizations (05_hotspots.py)
Open and run the example
In this tutorial we will cover the use of the hotspot funtion and how it allows the easy creation of interactive visualizations. We will be working through example 05_hotspots.py which is included in the source code (download) under the summon/examples directory. The example 04_hotspots.py is also instructive. To begin, change into the summon/examples/ directory and open up 05_hotspots.py in a text editor. Also execute the example with following command.
The following visualization should immediately appear in a new OpenGL window.
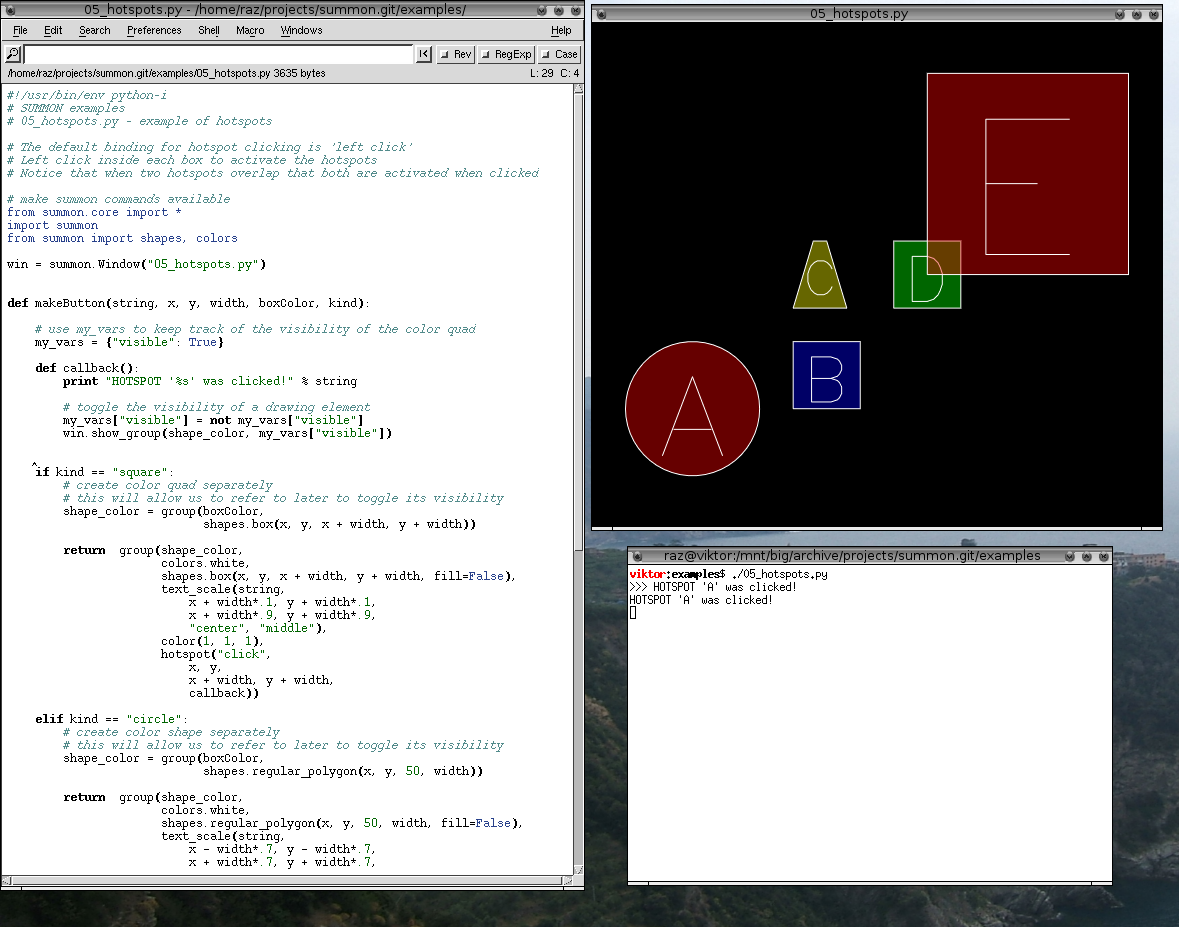
The shapes displayed act like buttons. Clicking within their shapes will toggle their background color and print a message to the standard output.
Overview of the example source code
In your text editor, the example 05_hotspots.py should contain python code similar to the code displayed below.
#!/usr/bin/env python-i
# SUMMON examples
# 05_hotspots.py - example of hotspots

# The default binding for hotspot clicking is 'left click'
# Left click inside each box to activate the hotspots
# Notice that when two hotspots overlap that both are activated when clicked

# make summon commands available
from summon.core import *
import summon
from summon import shapes, colors

win = summon.Window("05_hotspots.py")


def makeButton(string, x, y, width, boxColor, kind):

    # use my_vars to keep track of the visibility of the color quad
    my_vars = {"visible": True}

    def callback():
        print "HOTSPOT '%s' was clicked!" % string

        # toggle the visibility of a drawing element
        my_vars["visible"] = not my_vars["visible"]
        win.show_group(shape_color, my_vars["visible"])


    if kind == "square":
        # create color quad separately
        # this will allow us to refer to later to toggle its visibility
        shape_color = group(boxColor,
                            shapes.box(x, y, x + width, y + width))

        return  group(shape_color,
                      colors.white,
                      shapes.box(x, y, x + width, y + width, fill=False),
                      text_scale(string,
                          x + width*.1, y + width*.1,
                          x + width*.9, y + width*.9,
                          "center", "middle"),
                      color(1, 1, 1),
                      hotspot("click",
                          x, y,
                          x + width, y + width,
                          callback))

    elif kind == "circle":
        # create color shape separately
        # this will allow us to refer to later to toggle its visibility
        shape_color = group(boxColor,
                            shapes.regular_polygon(x, y, 50, width))

        return  group(shape_color,
                      colors.white,
                      shapes.regular_polygon(x, y, 50, width, fill=False),
                      text_scale(string,
                          x - width*.7, y - width*.7,
                          x + width*.7, y + width*.7,
                          "center", "middle"),
                      color(1, 1, 1),
                      hotspot_circle("click",
                          x, y, width,
                          callback))

    elif kind == "polygon":
        # create color shape separately
        # this will allow us to refer to later to toggle its visibility
        pts = [0, 0, 30, 100, 50, 100, 80, 0]
        shape_color = group(boxColor, polygon(*pts))

        return  translate(x, y,
                    scale(.1, .1,
                      shape_color,
                      colors.white,
                      line_strip(80, 0, *pts),
                      text_scale(string,
                          0, 20, 80, 80,
                          "center", "middle"),
                      color(1, 1, 1),
                      hotspot_polygon("click",
                          pts,
                          callback)))

# define three colors
red = color(1, 0, 0, .4)
blue = color(0, 0, 1, .4)
green = color(0, 1, 0, .4)
yellow = color(1, 1, 0, .4)

# add some boxes with hotspots
win.add_group(makeButton("A", 0, 0, 10, red, "circle"))
win.add_group(makeButton("B", 15, 0, 10, blue, "square"))
win.add_group(makeButton("C", 15, 15, 10, yellow, "polygon"))
win.add_group(makeButton("D", 30, 15, 10, green, "square"))
win.add_group(makeButton("E", 35, 20, 30, red, "square"))

# center the "camera" so that all shapes are in view
win.home()
Once again, we immediately create a new window using the summon.Window class.
I like to click, lets make a button!
As we saw in the previous tutorial, we can define more complex drawing elements by using a python function. In this example, we define a function makeButton to create a button that can react to mouse clicks. The arguments of our makeButton function are as follows:
def makeButton(string, x, y, width, boxColor, kind):
    ...
The argument string will be the label of our button, and x, y, width, and boxColor will be the location, width, and color of the button, respectively. The last argument kind will specify what kind of shape button we want.
As we did in the previous tutorial, we can call our function many times to create several buttons.
# define three colors
red = color(1, 0, 0, .4)
blue = color(0, 0, 1, .4)
green = color(0, 1, 0, .4)
yellow = color(1, 1, 0, .4)

# add some boxes with hotspots
win.add_group(makeButton("A", 0, 0, 10, red, "circle"))
win.add_group(makeButton("B", 15, 0, 10, blue, "square"))
win.add_group(makeButton("C", 15, 15, 10, yellow, "polygon"))
win.add_group(makeButton("D", 30, 15, 10, green, "square"))
win.add_group(makeButton("E", 35, 20, 30, red, "square"))
Each button, has a different label, location, color, and shape. In the following sections, we will look at the code for each kind of button shape.
Creating a callback
The first few lines within our makeButton function define a callback function (named callback) for our new button.
def makeButton(string, x, y, width, boxColor, kind):

    # use my_vars to keep track of the visibility of the color quad
    my_vars = {"visible": True}

    def callback():
        print "HOTSPOT '%s' was clicked!" % string

        # toggle the visibility of a drawing element
        my_vars["visible"] = not my_vars["visible"]
        win.show_group(shape_color, my_vars["visible"])
The callback function will be called by SUMMON when the button is clicked. This function prints a message to the standard output displaying the name of the button clicked. It will also toggle the boolean my_vars["visible"] (i.e. switch between True and False) and use the window function show_group to show or hide the drawing element shape_color. The drawing element shape_color will be the background color of the button and is defined in the next bit of code.
A square button? Use hotspot
The next bit of code creates a square button if we ask for it (i.e. kind == "square).
    if kind == "square":
        # create color quad separately
        # this will allow us to refer to later to toggle its visibility
        shape_color = group(boxColor,
                            shapes.box(x, y, x + width, y + width))

        return  group(shape_color,
                      colors.white,
                      shapes.box(x, y, x + width, y + width, fill=False),
                      text_scale(string,
                          x + width*.1, y + width*.1,
                          x + width*.9, y + width*.9,
                          "center", "middle"),
                      color(1, 1, 1),
                      hotspot("click",
                          x, y,
                          x + width, y + width,
                          callback))
We now see how color_shape is defined. It is a group containing a color boxColor and a new drawing element shapes.box, which is an axis-aligned rectangle. The shapes module contains many convenient shapes. If you browse the source code, you will see that the box is actually implemented with a quads drawing element. The box shape_color is defined separately and given a name (shape_color) so that we may refer to it in our callback (described above) and toggle its visibility (hide/show).
The rest of the square button is defined in the return statement. We see that the button background color shape_color is now used within the group, followed by a white outline of the button using shapes.box again, except now with the fill=False argument. The text label of the button is drawn using the text_scale function.
The last element in the group is the critical piece of code that brings our button alive.
                      hotspot("click",
                          x, y,
                          x + width, y + width,
                          callback)
This is a hotspot. It defines a rectangle (axis-aligned) between the coordinates (x, y) and (x + width, y + width) that will react to mouse clicks (the first argument specifies that this is a clickable hotspot). The final argument of the hotspot function specifies the callback function, which can be any Python function that takes no arguments (See documentation for more details). We have passed our callback defined in the previous section. And that is all there is to the square button.
What about a circle button? Use hotspot_circle
Now let's say you want to make a circle button. Well, SUMMON provides a special hotspot just for the occasion: hotspot_circle. Below is the code that executes if we ask for a circle button (i.e. kind == "circle").
    elif kind == "circle":
        # create color shape separately
        # this will allow us to refer to later to toggle its visibility
        shape_color = group(boxColor,
                            shapes.regular_polygon(x, y, 50, width))

        return  group(shape_color,
                      colors.white,
                      shapes.regular_polygon(x, y, 50, width, fill=False),
                      text_scale(string,
                          x - width*.7, y - width*.7,
                          x + width*.7, y + width*.7,
                          "center", "middle"),
                      color(1, 1, 1),
                      hotspot_circle("click",
                          x, y, width,
                          callback))
The variable shape_color is defined again, except now using the function shapes.regular_polygon. which approximates a circle when nsides is high (50). shapes.regular_polygon also has an optional fill argument, which when False strokes the outline of a polygon. Most of the returning drawing group is the same as before except with a new kind of hotspot: hotspot_circle.
                      hotspot_circle("click",
                          x, y, width,
                          callback)
This hotspot works as before, except we define a clickable circle region that is centered at (x, y) with radius width. The same callback function (callback) is given.
Any (convex) polygon button with button_polygon
The last kind of button is a convex polygon. It is defined nearly the same as the previous buttons, except with the hotspot_polygon function. The points of our polygon are defined with the list pts in the following code.
    elif kind == "polygon":
        # create color shape separately
        # this will allow us to refer to later to toggle its visibility
        pts = [0, 0, 30, 100, 50, 100, 80, 0]
        shape_color = group(boxColor, polygon(*pts))

        return  translate(x, y,
                    scale(.1, .1,
                      shape_color,
                      colors.white,
                      line_strip(80, 0, *pts),
                      text_scale(string,
                          0, 20, 80, 80,
                          "center", "middle"),
                      color(1, 1, 1),
                      hotspot_polygon("click",
                          pts,
                          callback)))
Notice that the polygon points pts are used for both drawing the polygon and defining the clickable region of the hotspot_polygon. Also notice that the entire group of drawing elements is wrapped in a translate transform. The translate not only translates drawing elements, which we saw in the last tutorial, but also translates non-graphical elements such as the clickable region of the hotspot.
And much more...
This is only a simple example. You can define hotspots of arbitrary shape using hotspot_custom.
See the remaining scripts in the summon/examples/ for examples of SUMMON's more powerful features. For more documentation, also see the manual and online API documentation.
Next time: Custom mouse and key bindings!
In the next tutorial (to be written), we will explore the Window.set_binding function and how we can use it to define new mouse and key bindings. Until, then see 09_key_binding.py for an example.